ello everyone!
Daniel aka „Extune“ here for a brand new tournament report. We got the chance to test out the new faction rules for Nords at our friends awesome club in Slovenia: AmuletD20!
All three of us travelled from Graz to Medvode, near Ljubljana to compete with our neighbours and we all felt excited and hopefully prepared for playing with the “new patch”. Alex brought his trusty W’adruhn, Lukas went with his shiny new Weaver Court and I chose my good old Nords.
It was a one-day tournament with 24 players, some tough competition, but as always when we visit Slovenia the most important part are the friendly banter, welcoming atmosphere and overall good vibes there!
(If you haven’t seen it yet, they are hosting a huuuge tournament in October this year rumored to be around 100 players! Check them out => https://www.longshanks.org/event/31439/ )
Anyway, back on topic: I played a few games with a Jarl Warlord list right after the update and decided to bring him to the tourney. Reliable reinforcement, great surpremacy and still three tribal tactics felt great and stable for me. This was my list:
=== The Last Argument of Kings ===
Get your Jarl strength on 3.0 [2000/2000]
Nords
== Warlord Jarl [140]: Ty Jokull, the Rimeheart
* Raiders 3 [130]: Captain
* Huskarls 5 [275]: Thegn
* Bearsarks 3 [165]: Shield Biter
== Konungyr [160]: Elding, the Skypiercer, Lessons of the Jotun War
* Bow-Chosen 3 [180]:
* Steel-Chosen 3 [160]:
* Steel-Chosen 3 [160]:
* Steel-Chosen 3 [160]:
== Shaman [80]:
* Raiders 3 [130]: Captain
* Raiders 3 [130]: Captain
* Raiders 3 [130]: Captain
Four Raiders hitting the field either turn 1 if I cannot score on objectives turn 2 (depending on scenarios) followed by a wave of Steel Chosen supported by Bow Chosen and Bearsarks as well as a rather surprisingly tanky block of Huskarls for some kind of anvil was my chosen tactic.
Top that of that my lights come reliably in on a roll of 5- and my mediums at 3-/5- the reinforcement curve was looking nice.
The list had some weakness against heavily armored d3/d4 units but I hoped to be able to just break through in my Surpremacy turns as well as my Tribal Tactics and Relentless Blows for all my units! As we all know, volume is king and just one bad roll can win me a fight, haha 🙂
Game 1 – Kivi 3000 on Divide and Conquer
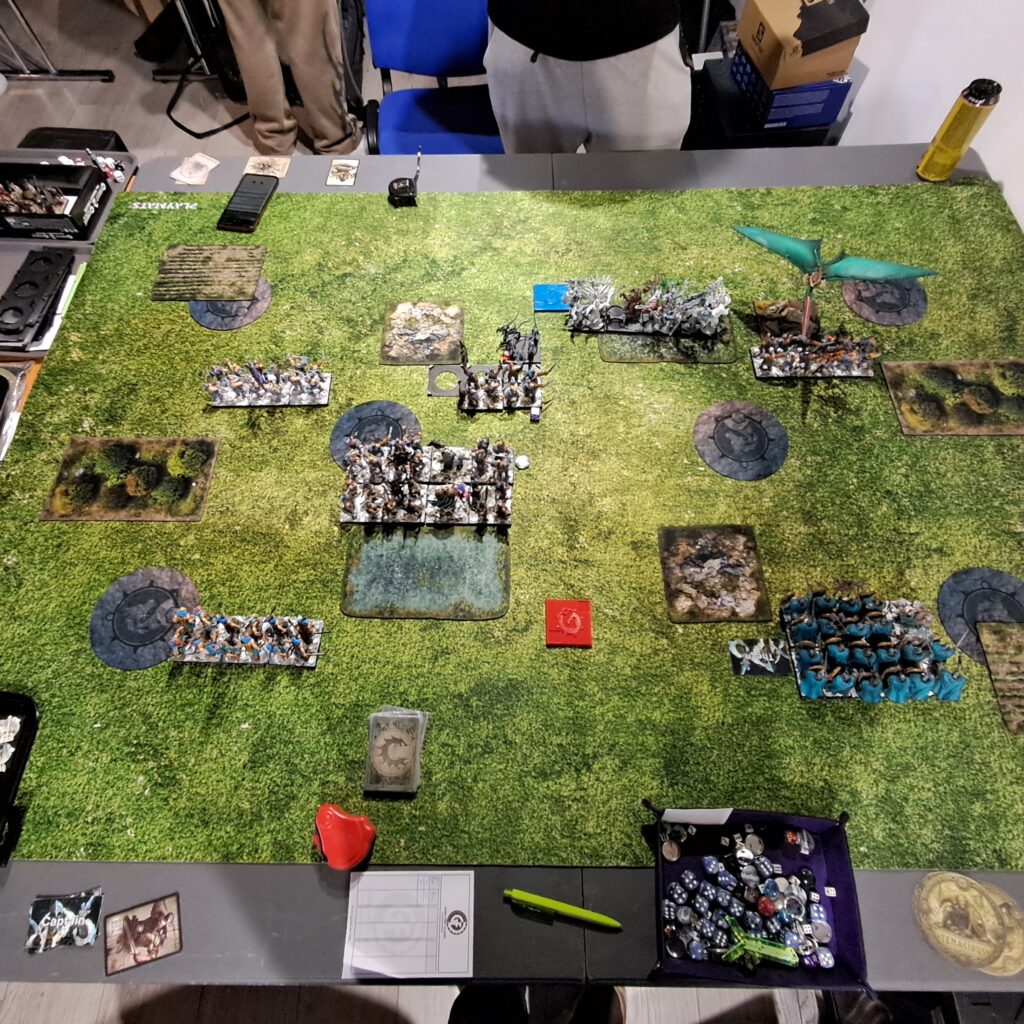
First round my opponent was Kivi3000! He brought Dinos, even the best Dino of them all a Tontorr! Coupled with a Matriach Queen as Warlord as well as Thunder Riders and even more pressure through Quatls and Slingers, I had to be rather careful on how to approach the matchup.
Kivi was a wonderful opponent, we had a relaxed atmosphere on the table which is so important especially round 1 to set the tone for the event! Hope to see him again on the battlefield!
His list:
=== The Last Argument of Kings ===
The wadi [2000/2000]
The W’adrhun
== Warlord Matriarch Queen [100]: Conquest
* Braves 3 [125]:
* Tontorr 1 [300]:
* Quatl 1 [180]:
* Blooded 3 [130]:
== Thunder Chieftain [170]: Death, Resilience
* Thunder Riders 3 [220]:
* Thunder Riders 3 [220]:
* Quatl 1 [180]:
== Predator [105]: Death, Hide of the Silent Hunter
* Hunting Pack 3 [120]:
* Slingers 3 [150]:
The scenario we where on was Divide and Conquer.
A scenario where I cannot go for turn 2 scoring, so the gameplan was simple: try to pressure him and his Slingers/HP early and don’t allow his Quatls to land on the zone. Cleanup with the second wave and hope it would be enough. The mighty Tontorr with his 26 wounds was rather scary, as well as his Thunder Riders.
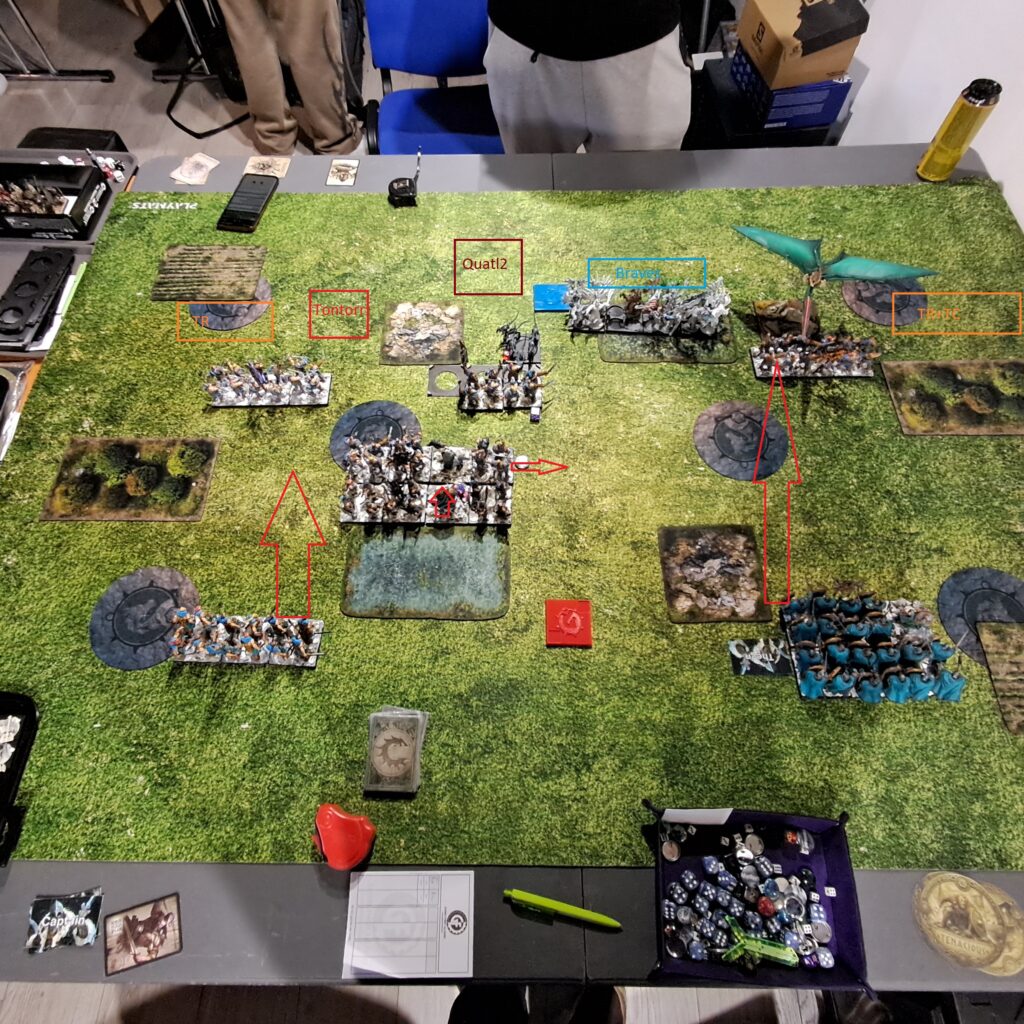
Turn 1
I picked my Bow Chosen, which I always do because I get two cards, rolled for my lights and got all 4 raiders in. My opponent got his Slingers and HP in, we proceeded to stage.
Turn 2
Now I flanked my Huskarls, picked another Steel Chosen but missed the other two rolls, damn!
He got only a solitary Quatl in.
However, his Slingers were not in Range and as usual would be picking off a regiment of Raiders each turn, if they are uncontested, the moved a bit forward and only got 1 ½ stands of one Raider units this turn. I sniped one HP stand with a good roll of my Shaman, and tried a move charge on the HP with my Raiders+Shaman in the middle. However my opponent cleverly positioned them beside the rock and as I was 4 wide I failed to connect because I couldn’t wheel past the rock with my Raiders, this cost me, because now I had to move-charge and block the HP with my more central Raiders and would be open to Slingers + Quatl on the right side. So here I also chose to put pressure on and move-charged the Quatl to try and bind him in place.
My Huskarls I tried to place in front of the Slingers, they wouldn’t care much about their ranged attacks. The one Steel Chosen I placed on the left flank to get in position to score on turn 2 with bothy my Mediums.
Unecessary risky moves by my part, I think the ranged threat just got the better of me this round.
Turn 3
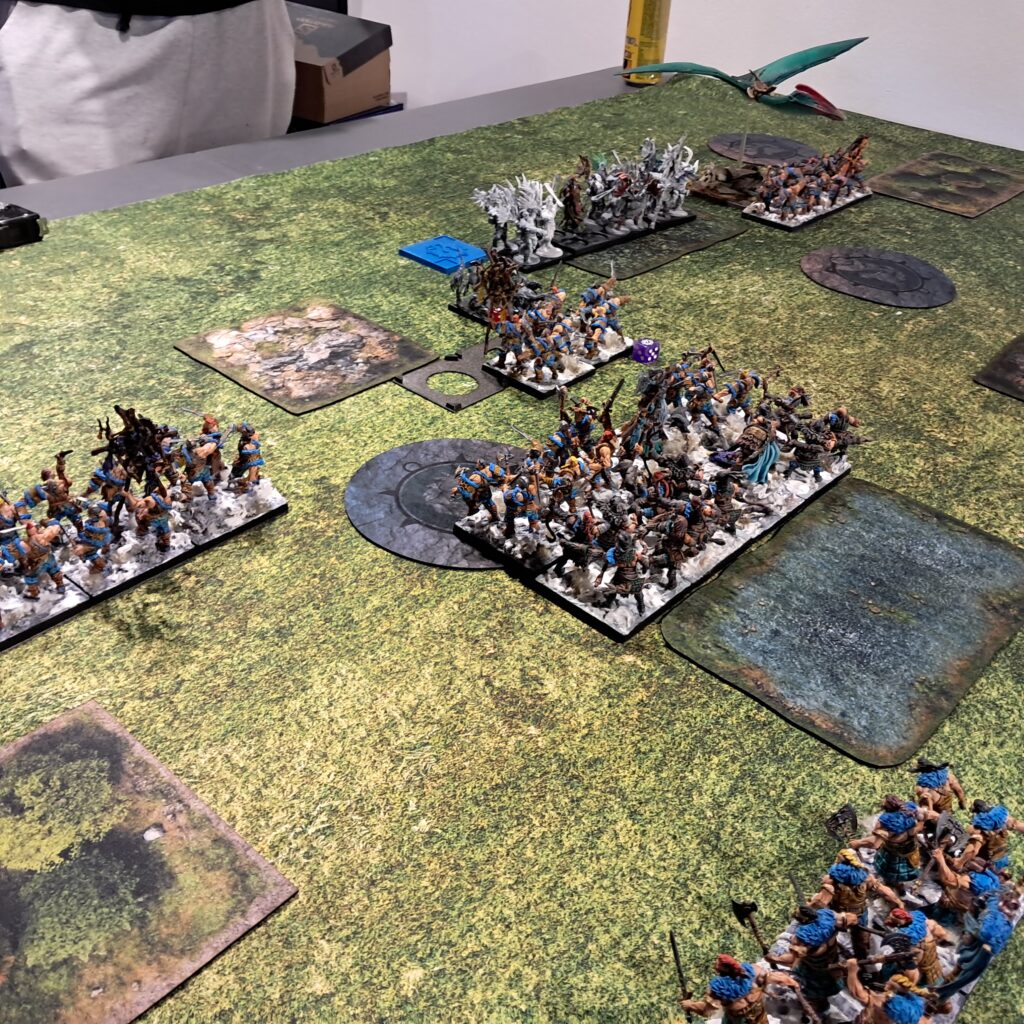
This round brought all of my remaining units on. He got his Tontorr, double Thunder Riders, Quatl and Braves on. Only Blooded where missing.
No surpremacy this turn.
He won the surpremacy and naturally chose to go first, activating his Slingers which just blasted my Raiders against the Quatl, they where in the Flank+Opportunist+Effective Range, goodbye!
I went with my remaining two stands of Raiders next, cleaning up the HP uninspired and trying to charge the Slingers in the flank. However, again I wasn’t able to wheel as we measured it out, because I was to close at the rocks… Damn! I had to move them without engaging the Slingers again. I decided to just step sideways to atleast block LoS a bit for the Slingers.
Next up was his Quatl reforming and trying to get some shots on the duo Raiders managing to kill one, but that was his turn.
He brought his small TR on the left side, facing my single Raider there, his bigger TR on the right side, his Tontorr on the gap on the left side ready to move into the middle zone and his Quatl right behind his Objective Marker which also shot at my remaining Raider killing it. His Braves+Queen went behind his Slingers.
I staged my Steel Chosen on the left side with one toe on the zone, just for scoring on turn 3. Went back with my Raider and staged my Bow Chosen a bit forward to open with some shots on his central Quatl doing half his HP in damage. My Shaman+Raiders went to the right, the Shaman blasting 1 ½ stands of Slingers away with a nice roll. Huskarls went up on the right side, trying to get in March-Clash range and staying on the zone. Bearsarks on the far right side, to keep the flank of my Huskarls clear. My last Steel Chosen came in right down the middle for a wave 3 attack.
Scoring 2 zones for me this turn.
Forgot to take a picture T3, apologies!
Turn 4
Ok, big turn. Time to spice it up!
He won the surpremacy and chose to go with his MQ turn. I also decided on going for my Jarl+Relentless Blows turn, which meant: Let the carnage begin!
As expected he went with Slingers first, cleaning up my Shaman+Raiders and then activating his Tontorr Chant+March+Charging my Bow Chosen, but failing to kill even a single stand, however he was Unyielding now this turn.
My first activation were Huskarls, because I wanted to jump his Slingers, preventing them to shoot. After that consideration was done, because he already activated, I made the choice to charge his Quatl: I would be positioned so his TR couldn’t get Impacts on my Huskarls and beeing in my front and opening their flank up for my Bearsarks. However this meant my Huskarls went off the zone.
They charged-clashed and his Quatls survived on two wounds which was really surprising, but dice give and dice take away!
Next up where his TR, he chose the small ones on the left side, charge+clashing my Raiders. Nextup for me where my Bow Chosen, attacking the Tontorr and doing a surprings amount of damage! They are scary in melee, especially with a Konungyr in them, however this was a Tontorr, it only tickled him.
He went next with his Quatl against my Huskarls, doing nothing. I went next march+charged with SC on the left side his TR. Then his other Quatl went and only tried to move a bit forward because everything was blocked in, shooting a bit not doing much. Then I positioned my SC for counter charges next turn, he move his bigger TR a bit to the side because his own Quatl was blocking him. My Bearsarks stayed out of March+Charge of his TR and on his last activation he actually got the Charge off with his Braves+MQ in the side of my Huskarls. This was enough to get 2 of his stands on the zone with none of mine because I charged off it with my Huskarls….Ouch!
Scoring this turn 2 zones for my opponent.
Turn 5
So I had less cards than him, gambled for surpremacy and lost it
Tribal Tactics for Tenacious this turn.
He went with his Tontorr first, trying to cleanup my Bowsen, however he had miserable rolls for offense and I saved to still have a single stands+konny left, but making way for my SC behind.
First activation where my Huskarls to try and cleanup the Braves in my side and the Quatl as well.
The Quatl died, the Braves survived on 1 stand, and I had my defenses up, staring down his TR still which still would have to move through the forrest for a charge+clash. Nextup where his TR and he chose the small ones on the left side. They also rolled really badly not even managing to kill one stand of SC. I activated next and chose my SC infront of the Tontorr to Charge+Clash. 18 hits later, and doing 19 remaining wounds on the Tontorr they only stood on the corpse of the giant! Ha! What a crazy roll-off this was!
He then went forward with his remaining Quatl shooting my BC dead. I was activating and stalling a bit, so he went ahead with his TR and charged in the front of my Huskarls. Linebreaker still hurts, however with Defense 2, reroll 6es and Tenacious I was able to withstand the assault, atleast with a few Huskarls left. This opend the way for my Sarks to position them to get a flank charge on the TR off for next turn.
Scoring went 1 zone each.
Turn 6
This time surpremacy went to me, yay!
Tribal Tactics Flank Charging!
I went with my Huskarls first, just to try and get his MQ down for the Warlord points! I managed to do that and I was happy about that.
He went with his TR and cleaned up my remaining Huskarls with an inspire+clash. Nextup where my SC on the left side, cleaning his remaining 2 Stands TR up, making the way free for the zone on his side next turn.
His Slingers, down to 2 Stands, shot at my Steel Chosen in the middle and cleaned up one of them. Nextup where my Bearsarks, getting in the Flank of his TR and nearly outright killing them, he was left with 3 wounds.
His Quatl was trying to get into the middle and made a charge+clash on my remaining Steel Chosen in the middle, but not even getting a stand and I clapped back and wiped the last few wonds off of him. He only had his TR and Blooded left to score. And I had an open way with my SC on his zone, my Sarks and Steel Chosen in the middle.
This meant that only 1 zone scoring went to me this turn.
Time was also called here, leaving me to win with 11:9 points!
Conclusion:
Extremely close game. I made some huge errors in my setup and staging and some very lucky rolls brought me back in the game. In hindsight I should have went with atleast 2 medium Raiders on this scenario, threating the flanks to score his zones, because he was staging very centrally and he had less smaller stuff to block me. At least that are my Afterthoughts!
Anyway, it was a great game against a very nice opponent. We both had some very clutch moments, failing charges and defense rolls equally and the score showed that! I would gladly play Kivi3000 anytime again and hope to meet him!
Onto the next game….